Verifying patient and study information and upload images/files
After selecting your images/files, you need to verify the patient and study information before uploading the images/files to the Upload Portal.
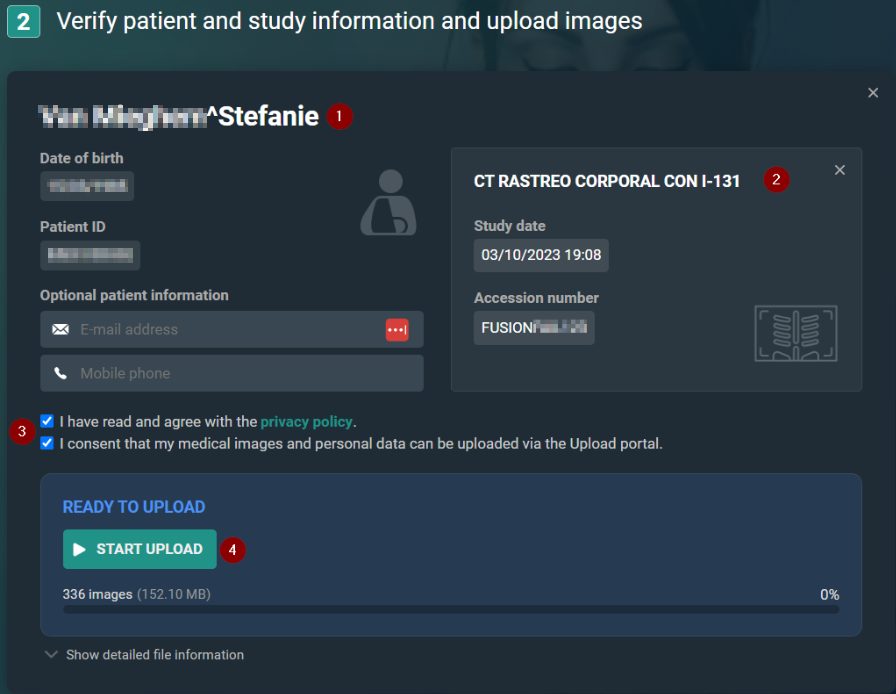
Verify and Upload Overview
Number | Designation | Description |
|---|---|---|
1 | Patient information | The patient information (Date of birth, Patient ID) of the images/files selected for upload. Patient e-mail and phone number are optional fields. They will be used as a reference or if the hospital needs to contact you. |
2 | Study information | The study information (Study date, Accession number). |
3 | Optional comment | You can add an Optional comment for each study that you upload. Here you can add a reason for uploading the specific study or provide additional information. |
4 | Document information | Displays the number of DICOM and non-DICOM files added to the study. |
5 | Privacy policy & patient consent | These are mandatory fields. You must agree to the privacy policy and consent to sharing your medical images and personal data with the hospital via the upload portal. |
6 | Start upload | This button initiates the upload. It is not available until you have agreed to the privacy policy and patient consent. |
Adding non-DICOM files
 | Note: To upload non-DICOM files, at least 1 DICOM file must be uploaded. An error message is displayed if a non-DICOM file is selected without a DICOM file. Adding a DICOM file will resolve the error. |
Adding non-DICOM files to a single study
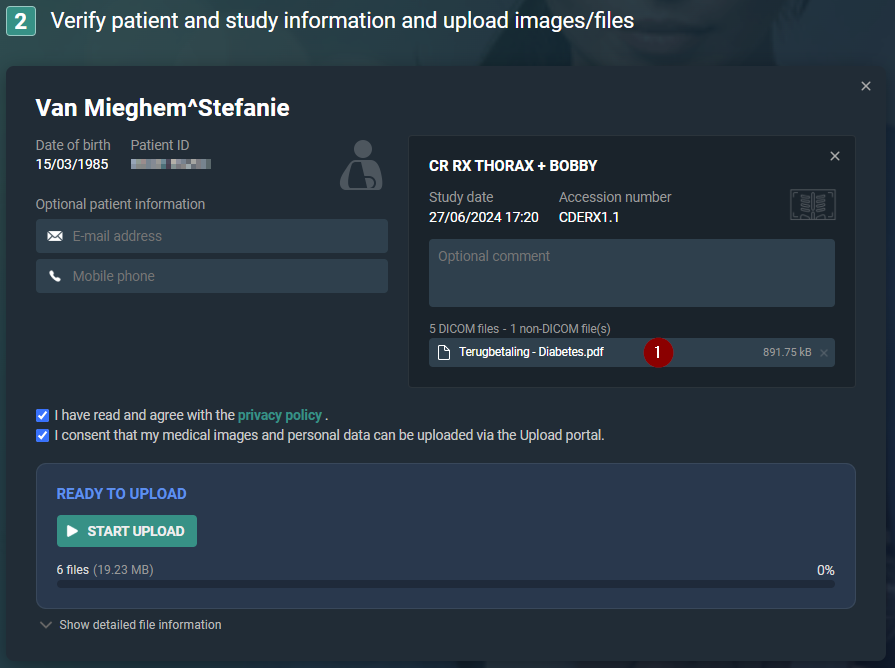
When you upload non-DICOM files to a single study, they will be matched automatically to the study.
Adding non-DICOM files to multiple studies
When uploading non-DICOM files with multiple studies, non-DICOM files will not be linked automatically to the studies. The documents are displayed at the top of the page and will need to be linked manually to the correct study.

Number | Designation | Description |
|---|---|---|
1 | Please add the following files to a study or remove them | Non-DICOM files that have been added to the upload portal, but are not yet linked to a study are displayed here. To ensure these files are uploaded, they must be added to a study or removed. Click on a file to mark the file as selected. The icon will change from a document to a checkmark. The number of non-DICOM files that have been selected is displayed in the drop-down list Add selected files to study. |
2 | Non-DICOM files selected to be added to a study | From this drop-down list, the available studies to which the non-DICOM files can be added are listed. Clicking on a study from the drop-down list adds the selected non-DICOM file to the study (visible in the study information section) and removes it from the list of unassigned non-DICOM files. Repeat the process of adding the non-DICOM files to a study until all non-DICOM files have been added to a study or removed and the header Please add the following files to a study or remove them has disappeared from panel 2. |
3 | Remove selected files | You can remove selected files from the upload portal by clicking Remove {0} selected file(s). To remove all files at once, click Select all and then Remove {0} selected file(s). |
4 | Select all / Deselect all | You can select all non-DICOM files using this button. Once all files are selected you can: • Remove all files from the upload portal. • Add all files to a study using the drop-down. If all files have been selected, this button changes to Deselect all. |
5 | Study | The study panel displays information about the study. The non-DICOM files added to the study are also listed. |
6 | File information | Non-DICOM files successfully linked to study are displayed within the study panel. The number of DICOM and non-DICOM files added to the study is provided. |
How to select and add non-DICOM files to a specific study
1. Under Please add the following files to a study or remove them, click on the desired non-DICOM files to mark them as selected.
2. Click on the Add x selected files to study drop-down list and select the desired study.
a. Repeat this process until all non-DICOM files have been added to a study or removed.
3. Continue to the verification and upload instructions.
To upload your selected images/files
1. Review the patient information:
a. Verify that you added the correct patient to the Upload portal.
b. Optionally, enter your personal e-mail address or mobile phone number.
2. Check the study information:
a. Verify that you added the correct study to the Upload portal.
b. Optionally, add an Optional comment for each study that you upload.
c. Review the documents linked to the study or add additional non-DICOM files.
3. Agree to the privacy policy & consent to share your medical images and personal data with the hospital via the upload portal.
4. Click the Start upload button.
 | Important! Do not close your browser during upload. |
Result: The status Uploading is displayed. Once the upload is complete, a success message will appear and you will have the option to start a new upload.
| Note: Accession numbers and Patient IDs will be anonymised during upload. This is to avoid mismatches in DeepUnity PACSonWEB |
File upload statuses
• Uploading: The upload is in progress. During this process, you can pause or cancel the upload.
◦ Pause upload: Click this button to pause the upload.
◦ Resume upload: Click this button to resume a paused upload.
◦ Cancel upload: Click this button to cancel the upload.
| Note: Click reset or start a new upload to return to the main page and start a new upload. |
• Validating files: The upload portal is scanning for malware. We perform a malware scan of the images to ensure that no viruses have been uploaded that could infect the hospital/institution.
• Upload successful: The upload is complete. All files have been successfully uploaded to the hospital/institution.
• Start a new upload: After a successful upload, you can start a new uplod by clicking start a new upload.
Once the message Upload successful appears in the panel, you can safely close the browser or start a new upload.